Grade Items
Grade items represent the individual assignments, quizzes, discussions, etc. Each grade item has its own entry in the grade book which you assign a grade to for each student. Grade items can be linked to other course objects, such as assignments, quizzes, discussions, etc., or they can exist independently.
For example, you may be teaching a fully online course. Students are to submit all assignments through the Assignments tool, all quizzes/exams through the Quizzes tool and so on. You would need to create those activities with their respective tools and then create a grade item for each. You would then link the grade item to the activity. This can all be done when creating your different activities (assignments, quizzes, etc.) and grades can be entered from within those tools (assignments, quizzes, discussions, etc.)
Another example would be a fully face-to-face class. All assignments, quizzes, etc. are delivered in class with no use of Western Online. However, you still want to provide grades through the system. In this case you would create grade items from within the grade book. These grade items are not linked to any activities. You are simply going to enter the grades manually from within the grade book.
Creating Grade Items
Please note that there may be some different options when creating grade items depending on what grade system you are using. For example, if you are using a weighted system there will be a place to enter a percentage, whereas with a points system there will not.
To create a grade item do the following:
- Click Grade Tools in the nav bar and choose Grades. Make sure you are in the Manage Grades area.
- Click the New
 button and choose Item. You will have the following options for creating an item:
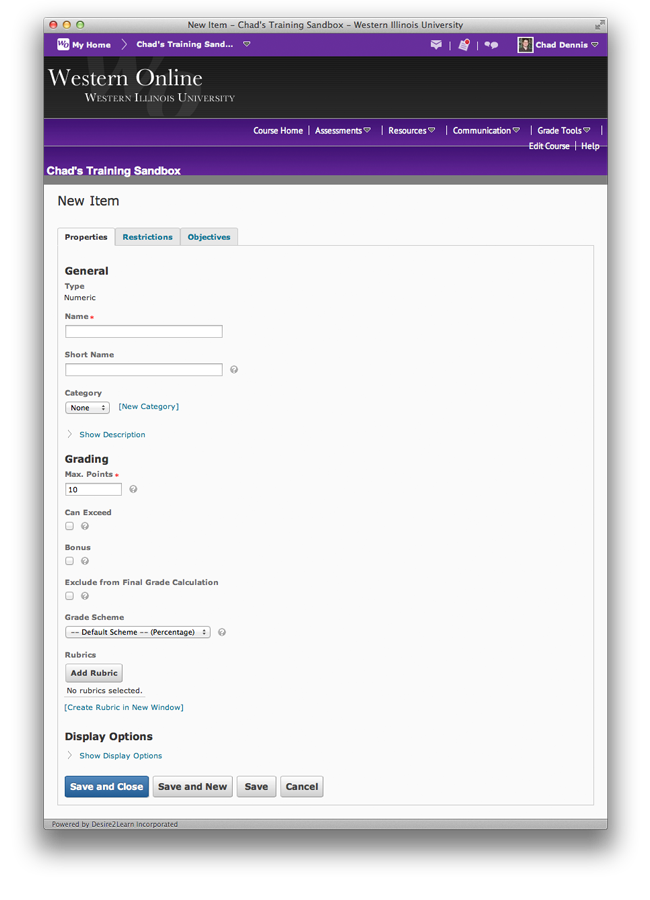
 - Numeric: Grade users by assigning a value out of a specified total number of points. E.g. 8/10
- Selectbox: Grade users by selecting the grade scheme level that best matches their achievement. E.g. "Very Good" or "B+"
- Pass/Fail: Grade users using a simple pass/fail grade scheme. E.g. "Pass" or "Fail"
- Formula: Automatically grade users using a custom formula based on achievement on other grade items. E.g. Give users who received at least 50% on all participation grade items a perfect attendance bonus. IF{ MIN{ [P1.Percent], [P2.Percent] } < 50, 0, 1
- Calculated: Calculate users' cumulative achievement across multiple grade items. E.g. Midterm Grade A1+A2+Q1+Q2 / Total Max. Points * 100 = 73%
- Text: Provide comments in the grade book that are not calculated in the final grade. E.g. "Course Evaluation Completed"
- Click on the type of column you want to create. You will have different options depending on the type of column you choose. For this example we will use Numeric as it is the most commonly used item type.
- In the Properties tab give the category a name (This is required).
- If you created a category for the item choose it from the Category drop down menu.
- Under Max. Points type in the total possible points.
- Other options include the following:
- Can Exceed: Select this option if you want to allow users' grades to exceed the maximum value specified for the item. E.g. 12/10
- Bonus: Bonus items are not included in the maximum points for the final grade. They are added on top of the calculated grade. Bonus items should also not be put in a category. Bonus items cannot make users' grades exceed the maximum points specified, unless the Can Exceed option is selected.
- Exclude from Final Grade Calculation: Select this option if you want the grade item to be excluded from final grade calculation.
- Grade Scheme: Select the scheme you want to use for the item.
- Rubrics: Add a rubric to the grade item.
- Display Options: Use this option to display the class average and/or grade distribution to users.
- Use the Restrictions
 tab to control the visibility of the item and set release conditions. Options include:
 - Category is always visible.
- Hide the category.
- Category is visible for a specific date range. To use the option place a check next to Has Start Date and Has End Date. Use the Calendar icons to choose your dates and the time drop down menus to choose the time.
- Release Conditions
- Use the Objectives
 tab to associate learning objectives with the item.
 - Click Save and Close.

Deleting a Grade Item
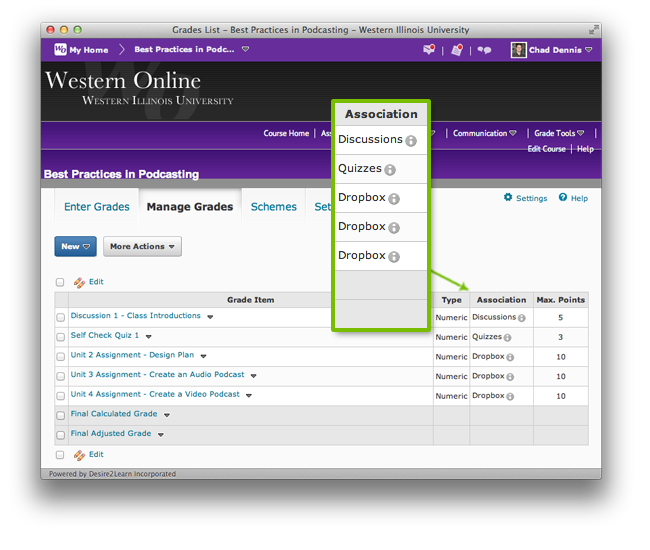
Grade items cannot be deleted if they are associated with activities in the system such as discussions, assignments, etc. You have to break the association before they can be deleted. In the Manage Grades area you can see if a grade item is associated with anything by looking in the Association column. If it is associated with a discussion it will say Discussion. If it is associated with a quiz it will say Quiz, and so on.
There will also be an exclamation icon you can click on to see the exact item it is associated with.

To break the association you will need to go to the tool and open the item. For example, if a grade item is associated to an assignment, you will need to go to that particular assignment in the Assignments tool and edit it (Discussion tool if it is a discussion, etc). Then you need to choose None for the Grade Item drop down menu and Save.
Once the association has been broken then the grade item can be deleted.
To delete a grade item do the following (Note: the item(s) cannot be linked to anything in D2L (assignment, quiz, discusstion, etc.):
- Click Grade Tools in the nav bar and choose Grades. Make sure you are in the Manage Grades area.
- Click the More Actions
 button and choose Delete.
 - Place a check next to the item(s) you want to delete.
- Click Delete
 .
.
