Western Online: Using the Grade Book
Welcome
Welcome to the Western Online: Using the Grade Book online tutorial brought to you by the Center for Innovation in Teaching and Research. This tutorial contains information on how to set up your grade book including creating categories, grade schemes, and much more.
Objectives
After completing this tutorial you will be able to:
- Explain the different grading systems
- Set up a grade scheme
- Use the grades setup wizard
- Set up grade categories
- Set up grade items
- Enter grades
This tutorial uses text poppers. Text poppers are words or images that you can hover over to get more information. Hover over the words Text Popper below to see an example.
Text Popper
Tutorial at a Glance
- Page 1
- Page 2
- Page 3
- Page 4
- Page 5
- Page 6
- Page 7
- Grade Categories
- Creating a Grade Category
- Deleting a Grade Category
- Page 8
- Grade Items
- Creating Grade Items
- Deleting a Grade Item
- Page 9
- Page 10
- Page 11
- Releasing the Final Calculated Grade
- Page 12
- Page 13
Use the links above and below to navigate through the tutorial.
Introduction
The Grades tool is used to create grade items and schemes for measuring users' performance, record grades, and share a grade book with students. You can set up grade schemes as well as create categories for different grade items.
Grades can be entered in a viriety ways including multiple items at once, by user, by item, or by category. Items are automatically added up by the system with no need to set up a calculated grade item. There is a Final Calculated Grade item already available by default.
In addition to the Final Calculated Grade item, there is also a Final Adjusted Grade item. This allows you to enter an adjusted grade to release to students.
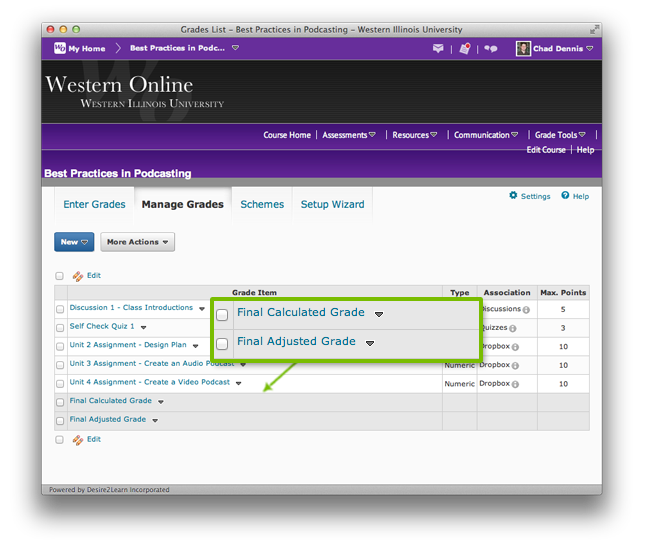
To access the grade book click Grade Tools in the nav bar and choose Grades.
Grading Systems
D2L provides three grade systems for you to choose from. Your grade book will have options available to you when creating items and calculating grades. Depending on what options are available depends on what grade system you use. The systems are:
Weighted System
Calculate grade items as a percentage of a final grade worth 100%. Grade items that reside in a category count as a percentage of that category, not of the final grade.
Example:
Discussions 10% of total grade
- Discussion 1 - 20% of this category
- Discussion 2 - 20% of this category
- Discussion 3 - 20% of this category
- Discussion 4 - 20% of this category
- Discussion 5 - 20% of this category
Assignments - 20% of total grade
- Assignment 1 - 20% of this category
- Assignment 2 - 20% of this category
- Assignment 3 - 20% of this category
- Assignment 4 - 20% of this category
- Assignment 5 - 20% of this category
Midterm Exam 35% of total grade
- Miderm Exam - 100% of this category
Final Exam 35% of total grade
- Final Exam - 100% of this category
Total for course is 100%
Points System
In the points system the maximum points assigned to a grade item are equal to its contribution to the final grade. Final grades are calculated by adding all grade items together.
Example:
- Discussion 1 - 10 points
- Discussion 2 - 10 points
- Discussion 3 - 10 points
- Discussion 4 - 10 points
- Discussion 5 - 10 points
- Assignment 1 - 20 points
- Assignment 2 - 20 points
- Assignment 3 - 20 points
- Assignment 4 - 20 points
- Assignment 5 - 20 points
- Midterm Exam - 50 points
- Final Exam - 50 points
Total for course is 250 points
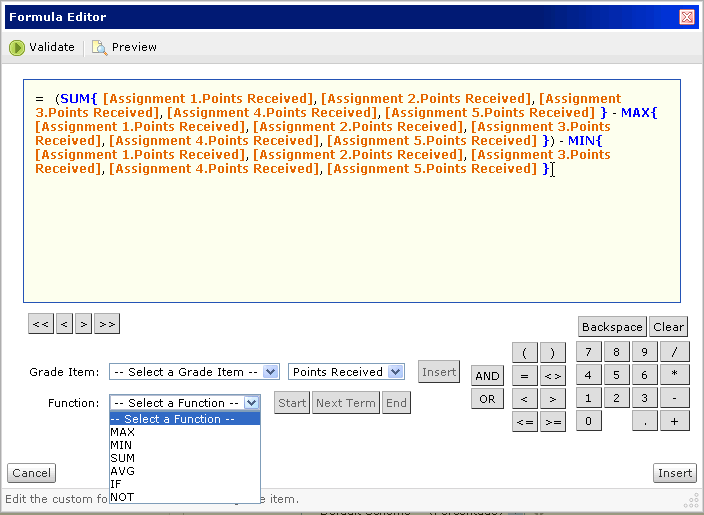
Formula System
Used for creating custom formulas. It is based on the points system, but allows you to set conditions around grade items to determine the final grade. The following is an example of the formula editor.
Grades Schemes
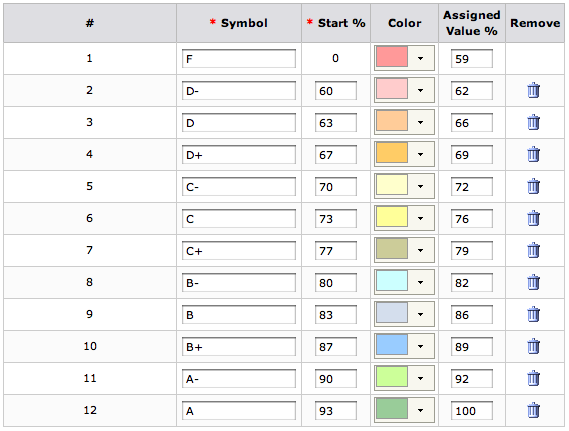
Grade schemes are a way of organizing users' performances on grade items into levels of achievement. Each achievement level has its own range of acceptable percentages and a symbol. A perfect example of this is a letter grade scheme. You can set up a scheme that will display a letter grade based on the percentage of the total points earned by a student. The system uses a percentages scheme by default.
In the following scheme a student who recieves an 88% will see a B+ for their grade.
Creating a Grade Scheme
It is recommended that you create your grades scheme before you go through the setup wizard. The setup wizard will ask you which default scheme you would like to use when creating grade items. If you don't create it first, it will not be available for you to use. (Note: You do not need to create a custom scheme if you are fine with just using the percentages scheme. If you do not want to set up a custom scheme you can skip this page)
To create a grade scheme do the following:
- Click Grade Tools in the nav bar and choose Grades.
- Click the Schemes along the top.
- Click the New Scheme button.
- Type in a name for your scheme.
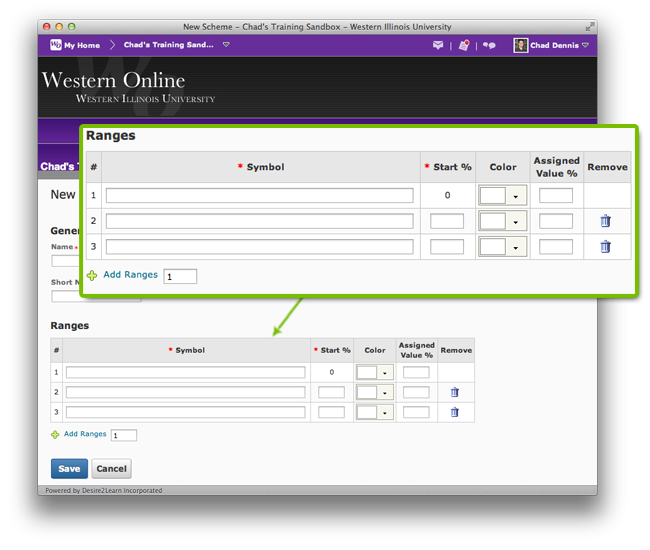
At this point you need to figure out how many ranges you will need for your scheme. For a plus (+) minus (-) letter grade scheme going from A to F you will need a total of twelve (12) ranges in your scheme. When creating a new scheme you are given three (3) ranges by default. So you will need to add nine (9) more.
- At the bottom type in 9 in the Add Ranges text box.
- Click Add Ranges.
- Starting with range 1 type in the letter F in the Symbol column.
- Range 1 has a Start % of zero (0) by default. For the Assigned Value % type in 59. So if the student recieves a 0% to 59% there will be the letter F displayed to them in the grade book.
- Now move on down the list of ranges to complete the scheme. D- 60% to 62%, D 63% to 66%, and so on.
- After you've completed inputting all your symbols and ranges click the Save button on the lower right.
Grades Setup Wizard
The Grades Setup Wizard takes you through a list of setup options to helps you make decisions about how grades should be calculated and displayed in the grade book. In a blank course with no grade items or categories created you will be taken directly to the grades setup wizard by default when you first go into the grade book. (Note: The options you choose in the setup wizard are not final. They can be changed through the Settings link located on the upper right of the page.) To go through the wizard do the following:
- Click Grade Tools in the nav bar and choose Grades.
- Click Setup Wizard at the top of the page.
- Click the Start button to begin the wizard.
The wizard contains seven steps:
- Step 1: Choose Grading System: Choose Wieghted, Points, or Formula. Click Continue.
- Step 2: Final Grade Released: D2L provides you with two grade items; Calculated Final Grade and Adjusted Final Grade. The Calculated Final Grade automatically calculates the total grade and cannot be adjusted without editing grade item scores. The Final Adjusted Grade allows you to modify or adjust users' grades before releasing them. In this step you will choose which one you want to release to students. Click Continue.
- Step 3: Grade Calculations: Here you can choose to Drop ungraded items (only calculate grade items that have a grade entered into it) or Treat ungraded items as 0 (automatically puts in a grade of zero (0) for grade items that have had nothing entered into it). You can also choose to automatically keep final grade updated (recommended). Click Continue.
- Step 4: Choose Default Grade Scheme: This will be the default scheme used by grade items as you create them. You can leave it set to the default organization scheme, Percentages, or you can choose a custom scheme if you have created one. Click Continue.
- Step 5: Managing View Display Options: Choose the number of decimal places to display for your view. Click Continue.
- Step 6: Student View Display Options: Choose what you want the students to see in their view. Options include:
- Points grade
- Grade scheme symbol
- Grade scheme color
- Number of decimal places to display
- Number of characters to display for Text items
- Final Grade Calculation
- Step 7: Grades Setup Summary: Confirm your settings and click Finish.
After you click finish you will be presented with some options to start building your grade book including:
- Create a New Grade Category
- Create a New Grade Item
- Import Grades
- Create a New Grade Scheme
- Manage Grade Items and Categories
- Enter Grades
Grade Categories
Grade Categories can be used to organize and group related grade items into sections. For example, you can create categories for assignments, quizzes, discussions, etc. Grade categories are not required, but are especially handy when using a weighted system.
Creating a Grade Category
Please note that there may be some diffferent options when creating grade categories depending on what grade system you are using. For example, if you are using a weighted system there will be a place to enter a percentage, whereas with a points system there will not.
To create a grade category do the following:
- Click Grade Tools in the nav bar and choose Grades. Make sure you are in the Manage Grades area.
- Click New along the top and choose Category.
- In the Properties tab give the category a name (This is required). Other options in the Properties tab include:
- Can Exceed: Select this option if you want users' grades for the category to be able to exceed the maximum value for the category.
- Exclude from Final Grade Calculation: Select this option if you want the grade category to be excluded from the final grade calculation that appears in the Final Calculated Grade item.
- Distribution: Select this option if you want all items in the category to be worth the same amount. You will also use this section to drop items from the category, highest or lowest.
- Display class average to users: Select this option if you want to allow users to see the class average on the category.
- Display grade distribution to users: Select this option if you want to allow users to see a graph showing how grades were distributed between different percentiles.
- Use the Restrictions tab to control the visibility of the category and set release conditions. Options include:
- Category is always visible.
- Hide the category.
- Category is visible for a specific date range. To use this option place a check next to Has Start Date and Has End Date. Use the Calendar icons to choose your dates and the time drop down menus to choose the time.
- Release Conditions
- Click Save and Close.

Deleting a Grade Category
To delete a grade category do the following:
- Click Grade Tools in the nav bar and choose Grades. Make sure you are in the Manage Grades area.
- Click the More Actions button and choose Delete.
- Place a check next to the category you want to delete.
- Click Delete. (All grade items within the category will be deleted)
Grade Items
Grade items represent the individual assignments, quizzes, discussions, etc. Each grade item has its own entry in the grade book which you assign a grade to for each student. Grade items can be linked to other course objects, such as assignments, quizzes, discussions, etc., or they can exist independently.
For example, you may be teaching a fully online course. Students are to submit all assignments through the Assignments tool, all quizzes/exams through the Quizzes tool and so on. You would need to create those activities with their respective tools and then create a grade item for each. You would then link the grade item to the activity. This can all be done when creating your different activities (assignments, quizzes, etc.) and grades can be entered from within those tools (assignments, quizzes, discussions, etc.)
Another example would be a fully face-to-face class. All assignments, quizzes, etc. are delivered in class with no use of Western Online. However, you still want to provide grades through the system. In this case you would create grade items from within the grade book. These grade items are not linked to any activites. You are simply going to enter the grades manually from within the grade book.
Creating Grade Items
Please note that there may be some diffferent options when creating grade items depending on what grade system you are using. For example, if you are using a wieghted system there will be a place to enter a percentage, whereas with a points system there will not.
To create a grade item do the following:
- Click Grade Tools in the nav bar and choose Grades. Make sure you are in the Manage Grades area.
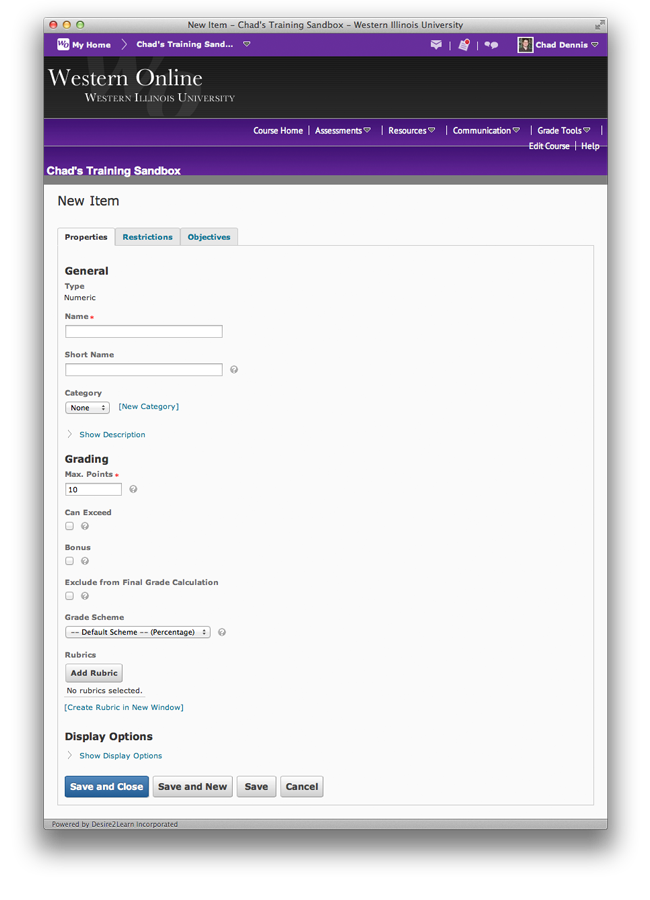
- Click the New button and choose Item. You will have the following options for creating an item:
- Numeric: Grade users by assigning a value out of a specified total number of points. E.g. 8/10
- Selectbox: Grade users by selecting the grade scheme level that best matches their achievement. E.g. "Very Good" or "B+"
- Pass/Fail: Grade users using a simple pass/fail grade scheme. E.g. "Pass" or "Fail"
- Formula: Automatically grade users using a custom formula based on achievement on other grade items. E.g. Give users who received at least 50% on all participation grade items a perfect attendance bonus. IF{ MIN{ [P1.Percent], [P2.Percent] } < 50, 0, 1
- Calculated: Calculate users' cumulative achievement across multiple grade items. E.g. Midterm Grade A1+A2+Q1+Q2 / Total Max. Points * 100 = 73%
- Text: Provide comments in the grade book that are not calculated in the final grade. E.g. "Course Evaluation Completed"
- Click on the type of column you want to create. You will have different options depending on the type of column you choose. For this example we will use Numeric as it is the most commonly used item type.
- In the Properties tab give the category a name (This is required).
- If you created a category for the item choose it from the Category drop down menu.
- Under Max. Points type in the total possible points.
- Other options include the following:
- Can Exceed: Select this option if you want to allow users' grades to exceed the maximum value specified for the item. E.g. 12/10
- Bonus: Bonus items are not included in the maximum points for the final grade. They are added on top of the calculated grade. Bonus items should also not be put in a category. Bonus items cannot make users' grades exceed the maximum points specified, unless the Can Exceed option is selected.
- Exclude from Final Grade Calculation: Select this option if you want the grade item to be excluded from final grade calculation.
- Grade Scheme: Select the scheme you want to use for the item.
- Rubrics: Add a rubric to the grade item.
- Display Options: Use this option to display the class average and/or grade distribution to users.
- Use the Restrictions tab to control the visibility of the item and set release conditions. Options include:
- Category is always visible.
- Hide the category.
- Category is visible for a specific date range. To use the option place a check next to Has Start Date and Has End Date. Use the Calendar icons to choose your dates and the time drop down menus to choose the time.
- Release Conditions
- Use the Objectives tab to associate learning objectives with the item.
- Click Save and Close.
Deleting a Grade Item
Grade items cannot be deleted if they are associated with activities in the system such as discussions, assignments, etc. You have to break the association before they can be deleted. In the Manage Grades area you can see if a grade item is associated with anything by looking in the Association column. If it is associated with a discussion it will say Discussion. If it is associated with a quiz it will say Quiz, and so on.
There will also be an exclamation icon you can click on to see the exact item it is associated with.
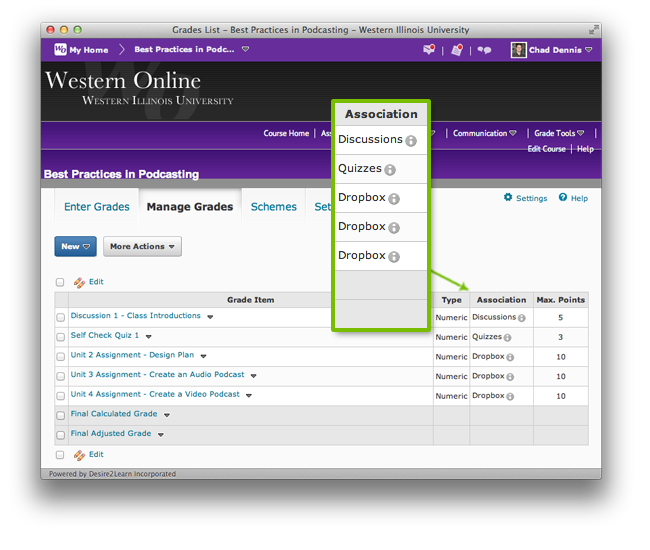
To break the association you will need to go to the tool and open the item. For example, if a grade item is associated to an assignment, you will need to go to that particular assignment in the Assignments tool and edit it (Discussion tool if it is a discussion, etc). Then you need to choose None for the Grade Item drop down menu and Save.
Once the association has been broken then the grade item can be deleted.
To delete a grade item do the following (Note: the item(s) cannot be linked to anything in D2L (assignment, quiz, discusstion, etc.):
- Click Grade Tools in the nav bar and choose Grades. Make sure you are in the Manage Grades area.
- Click the More Actions button and choose Delete.
- Place a check next to the item(s) you want to delete.
- Click Delete.
Entering Grades
There are several ways to enter grades into the grade book including:
- By User
- Click Grade Tools in the nav bar and choose Grades.
- Click Enter Grades along the top.
- Click on a students name in the list.
- Enter the grades and click Save at the bottom.
- By Category
- Click Grade Tools in the nav bar and choose Grades.
- Under the Manage Grades area click the drop arrow for the category and choose Enter Grades.
- Under the Enter Grades area click the drop arrow for the category and choose Enter Grades.
- Enter the grades and click Save at the bottom.
- By Grade Item
- Click Grade Tools in the nav bar and choose Grades.
- Under the Manage Grades area click the drop arrow for the item and choose Enter Grades.
- Under the Enter Grades area click the drop arrow for the item and choose Enter Grades.
- Enter the grades and click Save at the bottom.
- Directly from the tool (i.e. Assignments tool)
- Assignments - To grade an assignment submission do the following:
- Click Assessments in the nav bar and choose Assignments.
- Click on the assignment you want to grade.
- Scroll down to your list of students. Below their name you will see their submission.
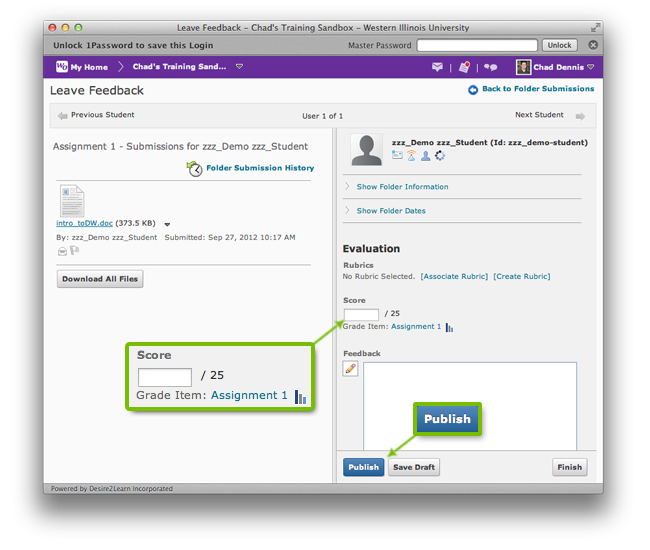
- Click Grade and Leave Feedback located to the right.
- The submission will be on the left pane. Click on it to view it.
- Put a score in the Score text box and type in some feedback in the Feedback text box.
- Click Publish.
- Discussions - To grade a discussion do the following:
- Click Communication in the nav bar and choose Discussions.
- Click on the discussion you want to grade.
- Click the post you would like to grade.
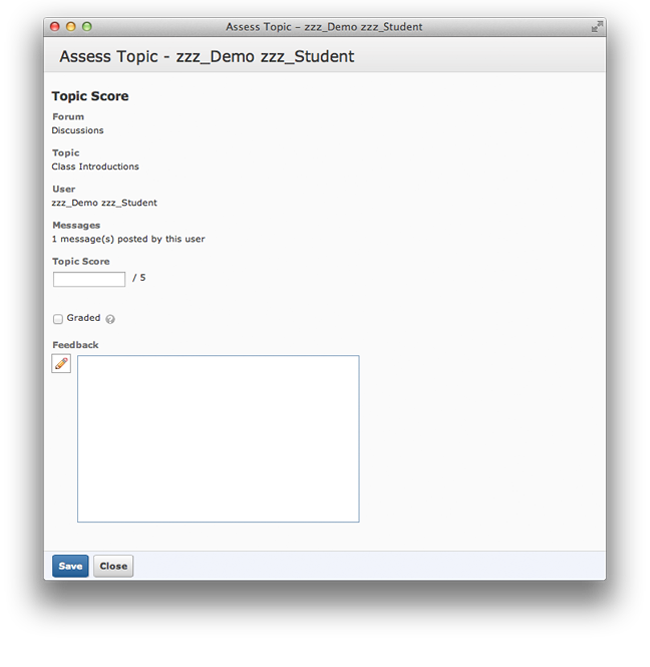
- Click the More Actions drop down menu and choose Assess.
- Put a score in the Topic Score text box and type in some feedback in the Feedback text box.
- Check the Graded checkbox (otherwise the grade will not go to the grade book).
- Click Save.
Grade Book Settings
The grade book has some settings that you may want to change depending on your personal preferences. Most of these settings are in the grades setup wizard. However, you may want to go back and change them and can do so at anytime.
To access the grade settings do the following:
- Click Grade Tools in the nav bar and choose Grades.
- Click Settings located on the upper right.
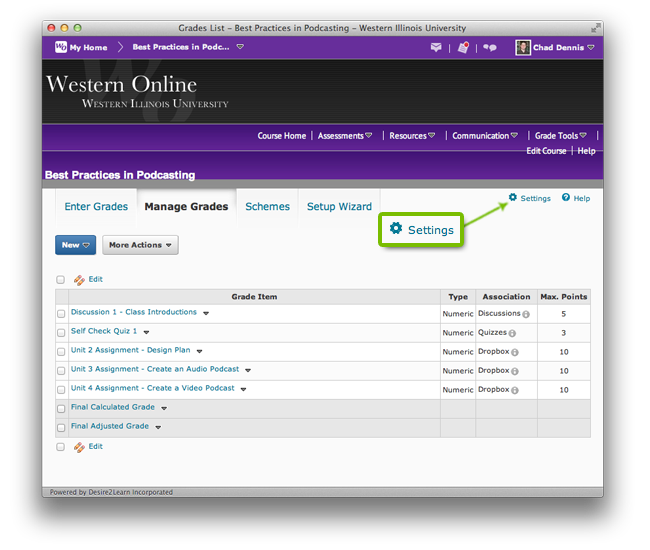
Next you will see three tabs.
- Personal Display Options: These settings affect how you as the instructor will view the grade book. Settings include:
- User Details
- Grade Details
- Number of characters to display for text items
- Number of columns before user details repeat
- Number of users before column header repeats
- Repeat Final Grades
- Start Page - Default Grades Area
- Org Unit Display Options: These settings affect how your students will view the grade book. Settings include:
- Grade Details
- Decimals Displayed
- Characters Displayed
- Final Grade Calculation
- ePortfolio Artifacts
- Calculation Options: These settings affect how grades are calculated and released. Settings include:
- Grading System
- Final Grade Released
- Grade Calculations
Releasing the Final Calculated Grade
As mentioned at the beginning of the tutorial, the sytem automatically calculates your grades by using the Final Calculated Grade item. However, this final grade is not released to the students by default. You have to tell the system to release it.
To release the Final Calculated Grade item do the following:
- Click Grade Tools in the nav bar and choose Grades.
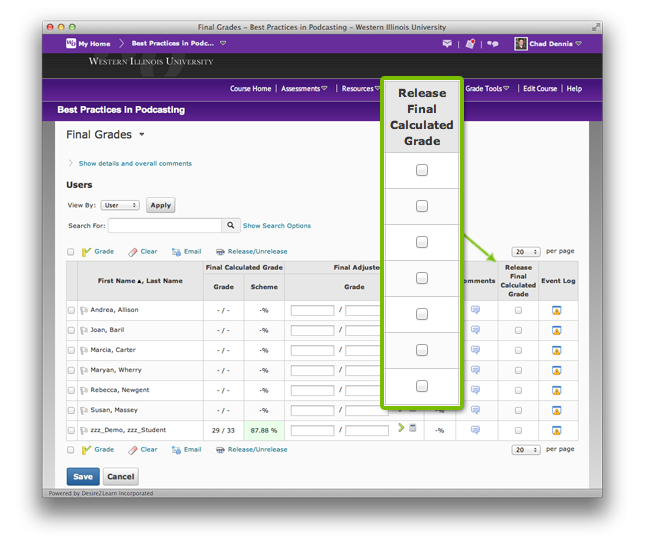
- In the Manage Grades area click the drop arrow for the Final Calculated Grade item and choose Enter Grades (Note: Clicking the drop arrow for the Final Adjusted Grade item will take you to the same place).
- Place a check for each student in the Release Final Calculated Grade column located on the right (Note: If you have chosen to release the Final Adjusted Grade item in your grade settings, than this will say Release Final Adjusted Grade).
- Click Save.
Self Check
Self Check Question 1
Self Check Question 2
Self Check Question 3
Self Check Question 4
Self Check Question 5
Self Check Question 6
Summary
Congratulations! You have completed the Western Online: Using the Grad Book online tutorial. You have learned how to:
- Explain the different grading systems
- Set up a grade scheme
- Use the grades setup wizard
- Set up grade categories
- Set up grade items
- Enter grades
FeedBack
Click here to help us improve our online tutorials.


